一直希望有一个小巧的固件下载、调试工具来在线调试STM32系列的MCU,看淘宝上买的ST-LINK/V2或者是山上的 JLink调试器,要么体积太大,要么USB接口使用的是B接口,都不太满意。
最近有时间,就打算自己做一个ST-LINK/V2-1调试器, ST-LINK/V2-1比ST-LINK/V2多出一了一个串口,更加实用。
- 原理图与PCB板图
STM32 Nucleo系列demo板中,都带有ST-LINK/V2-1调试器,并且我们可以得到相关的原理图与PCB板图:
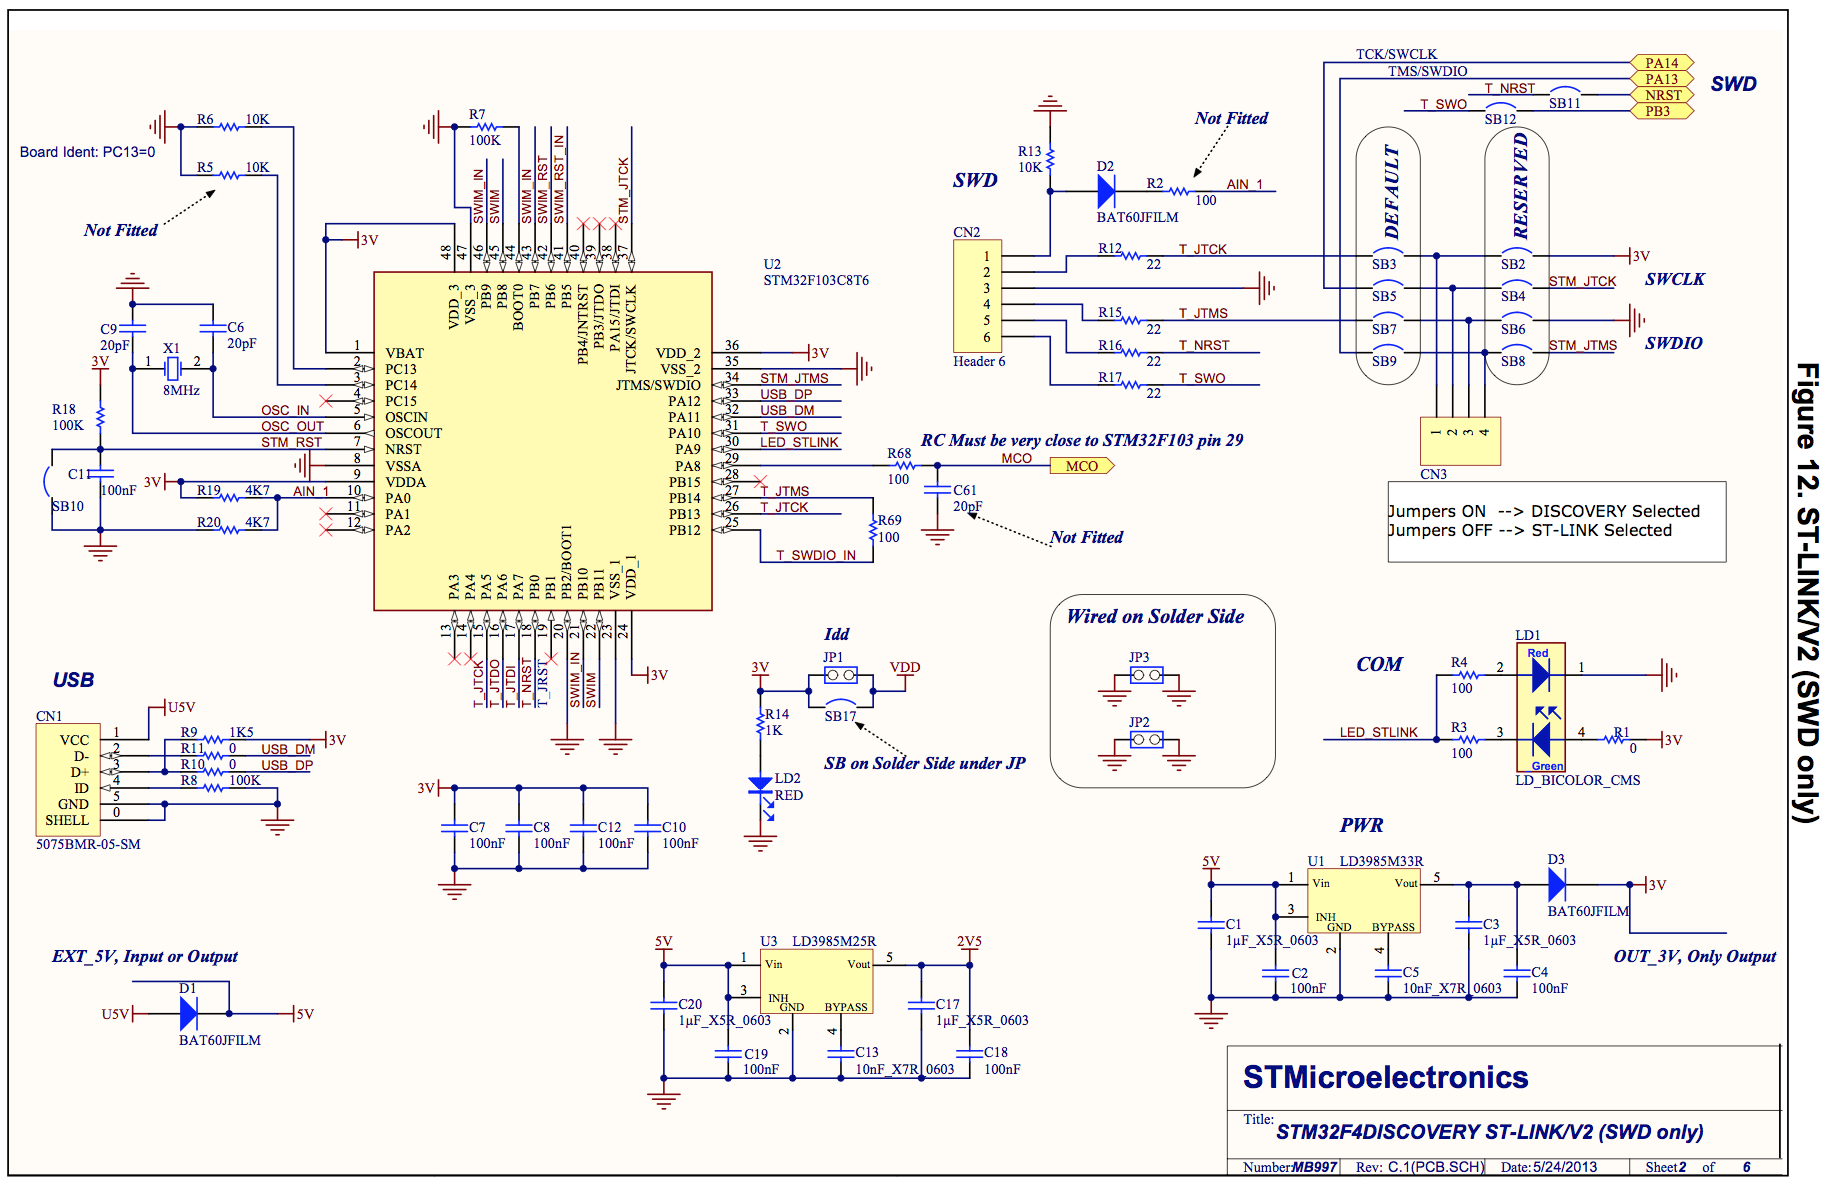
先看下 ST-LINK/v2原理图,如下(来自DM00039084.pdf - Discovery kit for STM32F407/417 lines):
而ST-LINK/V2-1的原理图如下(图片来自en.DM00231744.pdf – STM32 Nucleo-32 boards):
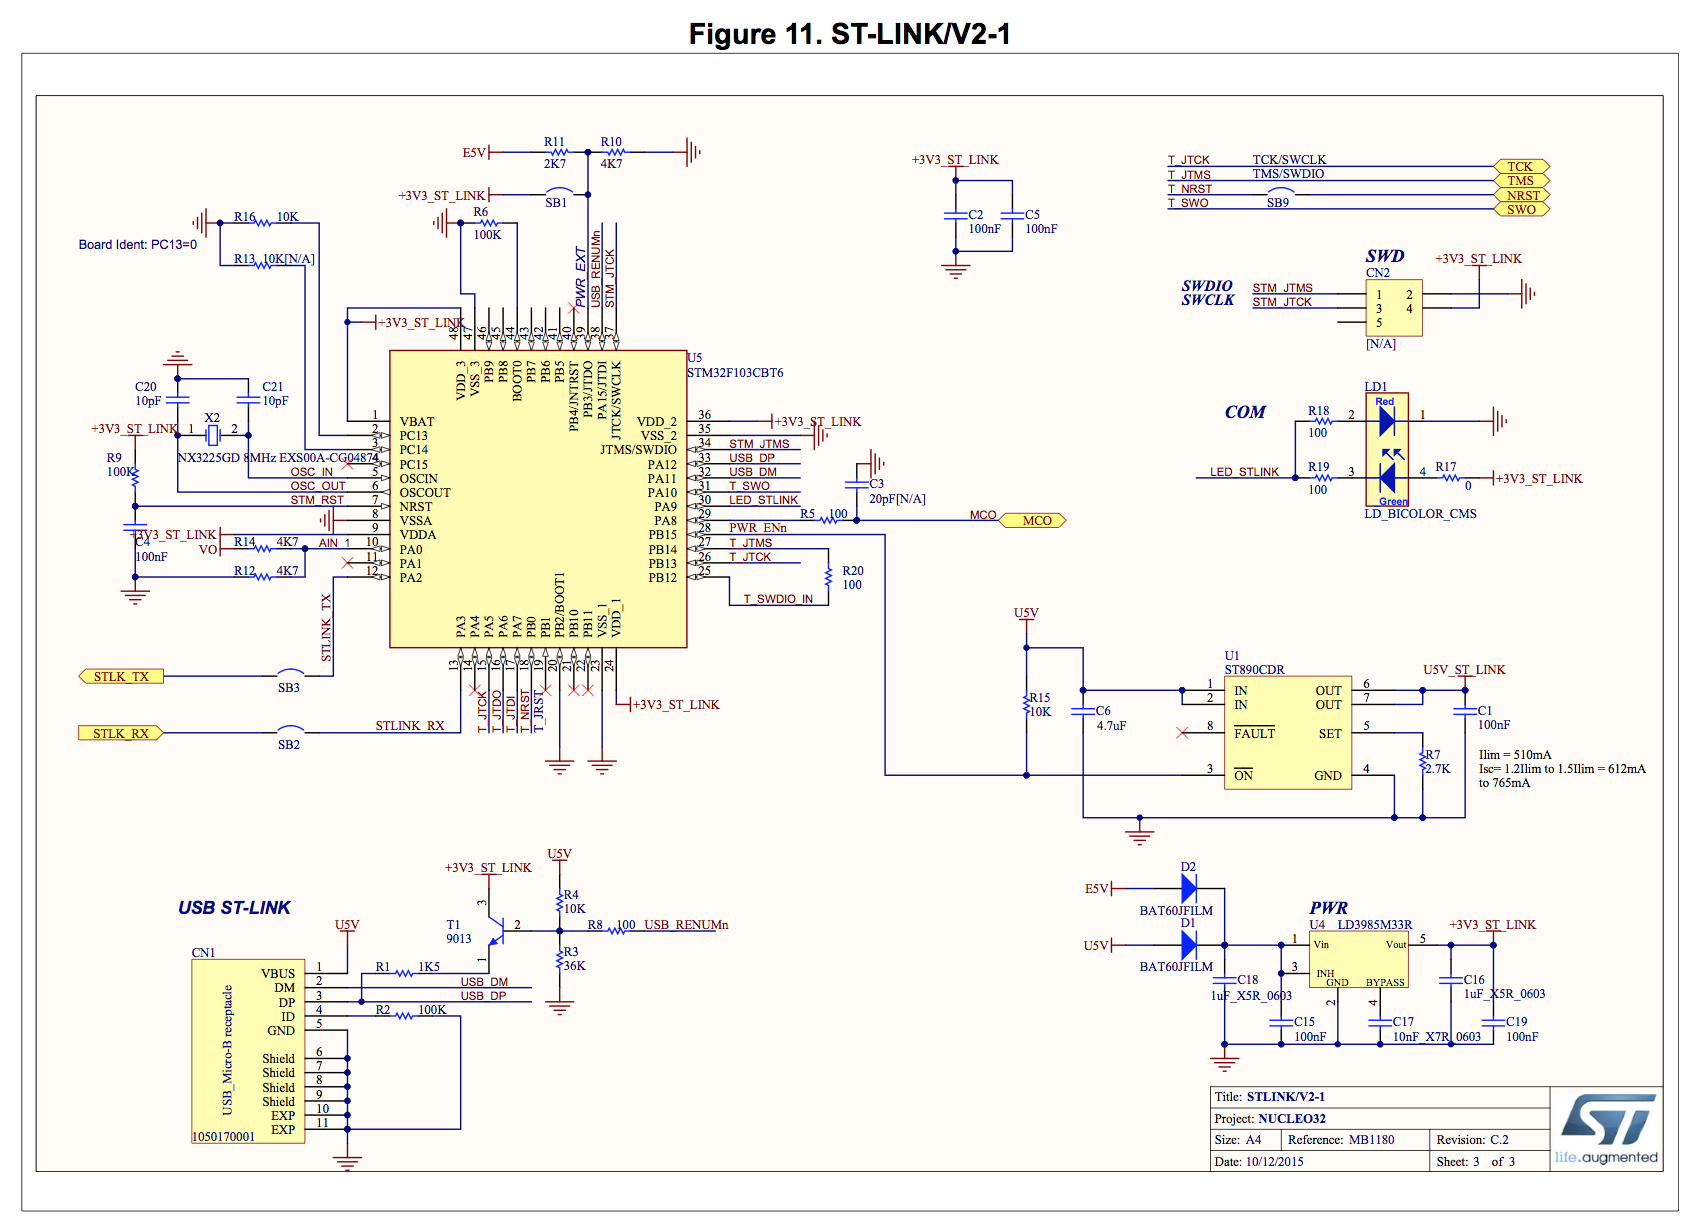
从原理图可以看到自己画板做一个ST-LINK/V2-1也不难。
[2016-07-18 21:40:06]
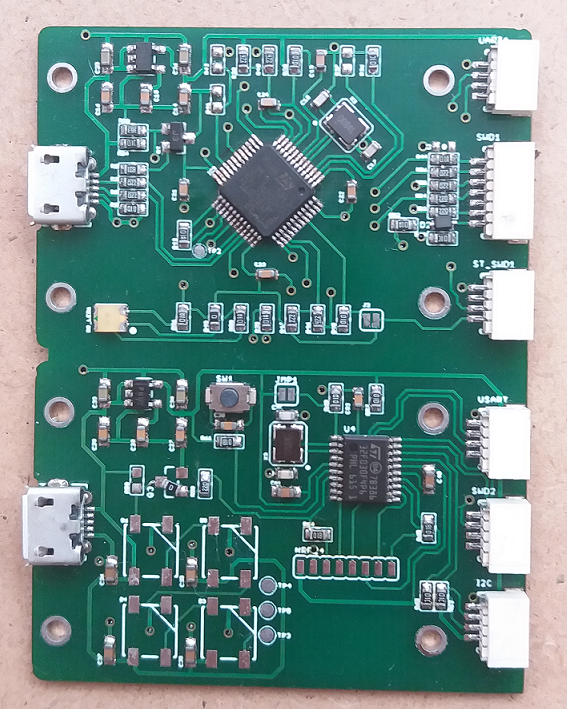
PCB板已经做好:
- 固件
比较不解的是ST已经将ST-LINK/v2, ST-LINK/V2-1的原理图与PCB图都公开出来了,为什么不将其固件也公布出来,这样会有更多的人使用他家的产品。
不管怎么样,高手已经将相关的固件提取出来了,我们可以通过SWD接口,更新固件了。
[待续]- PCB板已经做好,还缺少部分元器件
[2016-12-21 06:01:08] ST-LINK/V2-1 bootloader相关:
JLink-OB-072相关(http://akb77.com/g/stm32/jlink-ob/):
How to make JLink-OB-072 debug adapter.
Easy and correct way - buy from SEGGER and be happy.
Also right way - build it yourself but with some limitation. You can't use firmware update from JLink.exe only via STM DFU utility.
Now need prepare first step. Buy correct beer (Krusovice) and open it.
1. Extract binary part from JLinkARM.dll (from JLink_V512)
For example from offset 7153340 (0x6D26BC) and size 41192 (0x0A0E8).
Use any binary extraction tool as you prefer.
After this you have file with 41192 bytes such as this
Now move to step 2
You need STM32F072C8 chip with simple connection:
Power (see datasheet for STM32F072C8) and USB (PA12, PA11). No more.
Now connect debugger or use BOOT selection and write this file(bin_80000000.bin) from 0x8000000 addrerss and file from step 1 to 0x8004800 address.
Connect pins on STM32F072C8 with next
PA0 ----- 1K -----|<|---+ 3.3V   Activity LED
PA1 ----- 100 om ----TARGET RESET
PA2 ----- 100 om ---- TARGET SWCLK
PA3 -------------------- TARGET SWO
PA4 ----- 100 om ---- TARGET SWDIO
PA9 ----- 100 om ---- (COM TX) TARGET RX
PA10 --- 100 om ---- (COM RX) TARGET TX

For stability you can add crystal (with caps) to pins 5/6 but works w/o crystal.
If JLink say about firware update - you need prepare DFU image from 2 files above and use STM DFU utility to update (after agree to upgrade - device start in STM DFU mode or use BOOT pin).
NOTE:
1. 不知道这位高手是如何取得bootloader (bin_8000000.bin)的。
$ hexdump -C -v ~/Downloads/bin_8000000.bin
00000000  00 04 00 20 55 00 00 08  99 00 00 08 99 00 00 08  |... U...........|
00000010  00 00 00 00 00 00 00 00  00 00 00 00 00 00 00 00  |................|
00000020  00 00 00 00 00 00 00 00  00 00 00 00 99 00 00 08  |................|
00000030  00 00 00 00 00 00 00 00  99 00 00 08 99 00 00 08  |................|
00000040  03 48 85 46 00 f0 3a f8  00 48 00 47 97 00 00 08  |.H.F..:..H.G....|
00000050  00 04 00 20 11 48 80 f3  08 88 11 48 01 68 00 22  |... .H.....H.h."|
00000060  02 60 10 4a 91 42 10 d1  0f 48 10 49 01 60 10 48  |.`.J.B...H.I.`.H|
00000070  01 68 03 22 91 43 01 22  0a 43 02 60 0d 48 01 68  |.h.".C.".C.`.H.h|
00000080  81 f3 08 88 41 68 08 47  e4 e7 0b 48 01 68 81 f3  |....Ah.G...H.h..|
00000090  08 88 41 68 08 47 fe e7  fe e7 00 00 00 04 00 20  |..Ah.G......... |
000000a0  00 01 00 20 21 43 34 12  18 10 02 40 01 00 00 00  |... !C4....@....|
000000b0  00 00 01 40 00 00 00 00  00 48 00 08 06 4c 01 25  |...@.....H...L.%|
000000c0  06 4e 05 e0 e3 68 07 cc  2b 43 0c 3c 98 47 10 34  |.N...h..+C.<.G.4|
000000d0  b4 42 f7 d3 ff f7 b8 ff  00 01 00 08 10 01 00 08  |.B..............|
000000e0  02 e0 08 c8 12 1f 08 c1  00 2a fa d1 70 47 70 47  |.........*..pGpG|
000000f0  00 20 01 e0 01 c1 12 1f  00 2a fb d1 70 47 00 00  |. .......*..pG..|
00000100  10 01 00 08 00 00 00 20  00 04 00 00 f0 00 00 08  |....... ........|
00000110
NOTE:
相关的汇编代码(不全):
;; stm32f1x.cpu: target state: halted
;; target halted due to debug-request, current mode: Thread
;; xPSR: 0x01000000 pc: 0x08000054 msp: 0x20000400

=> 0x08000054:  11 48   ldr r0, [pc, #68]   ; (0x800009c) ;; 0x20000400
   0x08000056:  80 f3 08 88 msr MSP, r0
   0x0800005a:  11 48   ldr r0, [pc, #68]   ; (0x80000a0) ;; 0x20000100
   0x0800005c:  01 68   ldr r1, [r0, #0]
   0x0800005e:  00 22   movs    r2, #0
   0x08000060:  02 60   str r2, [r0, #0]
   0x08000062:  10 4a   ldr r2, [pc, #64]   ; (0x80000a4) ;; 0x12344321
   0x08000064:  91 42   cmp r1, r2 ;; r1=0x25014c06
   0x08000066:  10 d1   bne.n   0x800008a
   0x08000068:  0f 48   ldr r0, [pc, #60]   ; (0x80000a8) ;; 0x40021018
   0x0800006a:  10 49   ldr r1, [pc, #64]   ; (0x80000ac) ;; 0x00000001
   0x0800006c:  01 60   str r1, [r0, #0]
   0x0800006e:  10 48   ldr r0, [pc, #64]   ; (0x80000b0) ;; 0x40010000
   0x08000070:  01 68   ldr r1, [r0, #0]
   0x08000072:  03 22   movs    r2, #3
   0x08000074:  91 43   bics    r1, r2
   0x08000076:  01 22   movs    r2, #1
   0x08000078:  0a 43   orrs    r2, r1
   0x0800007a:  02 60   str r2, [r0, #0]
   0x0800007c:  0d 48   ldr r0, [pc, #52]   ; (0x80000b4) ;; 0x00000000
   0x0800007e:  01 68   ldr r1, [r0, #0]
   0x08000080:  81 f3 08 88 msr MSP, r1
   0x08000084:  41 68   ldr r1, [r0, #4]
   0x08000086:  08 47   bx  r1

   0x08000088:  e4 e7   b.n 0x8000054

=> 0x0800008a:  0b 48   ldr r0, [pc, #44]   ; (0x80000b8) ;; 0x08004800
   0x0800008c:  01 68   ldr r1, [r0, #0]
   0x0800008e:  81 f3 08 88 msr MSP, r1
   0x08000092:  41 68   ldr r1, [r0, #4]
   0x08000094:  08 47   bx  r1

;; 0x0800009c: 0x20000400
;; 0x080000a0: 0x20000100
;; 0x080000a4: 0x12344321
;; 0x080000a8: 0x40021018
;; 0x080000ac: 0x00000001
;; 0x080000b0: 0x40010000
;; 0x080000b4: 0x00000000
;; 0x080000b8: 0x08004800
2. 获取ST-LINK/V2固件的方法,请参考这篇文档:
http://www.taylorkillian.com/2013/01/retrieving-st-linkv2-firmware-from.html?m=1
- 软件调试
个人认为STM32所使用的HSE还是比较挑剔的,并且现在做使用的晶振的封装为3225, 就更难使其正常工作的,所以先开发一个能调试的软件是非常有必要的。
下面的这个软件就是基于ChibiOS/RT实时系统,使用HSI(内部高速时钟),如果板子上的RB LED指示灯以2Hz的频率闪烁,说明MCU能够正常运行,板子基本没有什么问题。
相关的代码可以从这里下载:2016_07_13_chibios-stlink-v2-hsi.tar.gz
[2016-07-18 20:48:13]验证HSE能否正常工作,请使用这份代码:2016_07_18_chibios-stlink-v2_1-hse.tar.gz,相关的文档请参考这篇:->@<-。
- 相关的参考文档
- http://akb77.com/g/stm32/jlink-ob/
- http://www.taylorkillian.com/2013/01/retrieving-st-linkv2-firmware-from.html?m=1
bootloader 提取可以参考 https://lujji.github.io/blog/reverse-engineering-stlink-firmware/
可惜我没有板子,没法提取ST-LINK/V2-1的bootloader …
另外,你文中的bin_8000000.bin是jLINK的固件,运行在STM32F072C8T6上,而ST-LINK/V2-1是STM32F103CBT6,我试了下,是不兼容的。
https://lujji.github.io/blog/reverse-engineering-stlink-firmware/ 上使用的方法比我的做法简单很多,也学到了不少东西,非常感谢〜
关于bin_8000000.bin文件,当时并没有太在意,只是知道它能加载jlink ob固件,激动了一下。文中相关的内容已经更新:从反汇编的代码可以看到它加载的固件的位置在0x08004800,而ST-LINK/V2-1的固件位于0x08004000, 所以是不能运行的。