我们知道BRO-DBG-LINK V2.1开发板是带有USB接口的,这使得我们可以在没有调试器的情况下,通过它来下载和运行固件。也就是说我们可以写一个bootloader, 通过这个bootloader来下载最新的固件,同时通过它来加载运行新的固件。
同时,之前也有提到过如何在ST-LINK/V2-1调试器上运行maple bootloader,当然这个方法也适用于BRO-DBG-LINK:
当然,之前提供的bootloader是存在一些小小的问题- 有时候这个USB外设不能被主机很好的识别出来:如在bootloader阶段,电脑会将该USB外设识别成一个DFU设备,这样我们就可以通过dfu-util来下载固件,下载后运行固件的时候,USB外设又会作为一个虚拟串口与主机进行通信。显然,在运行固件时USB权举出现了问题。这时候,我想到的是OpenPilot.org/TauLabs.org系列产品使用的也是ST公司的STM32系列MCU, 就可以很好地解决这个问题: 在bootloader阶段被识别成一个HID外设,在固件运行阶段可以被识别成一个HID+VCOM外设。
这里我们来看看CC3D是如何实现的-使用的是完全相同的MCU: STM32F103CBT6。
- USB协议相关
TODO
- CC3D的做法
我们先来看看CC3D是如何实现USB设备的重新枚举的:
1. 相关的电路如下图:
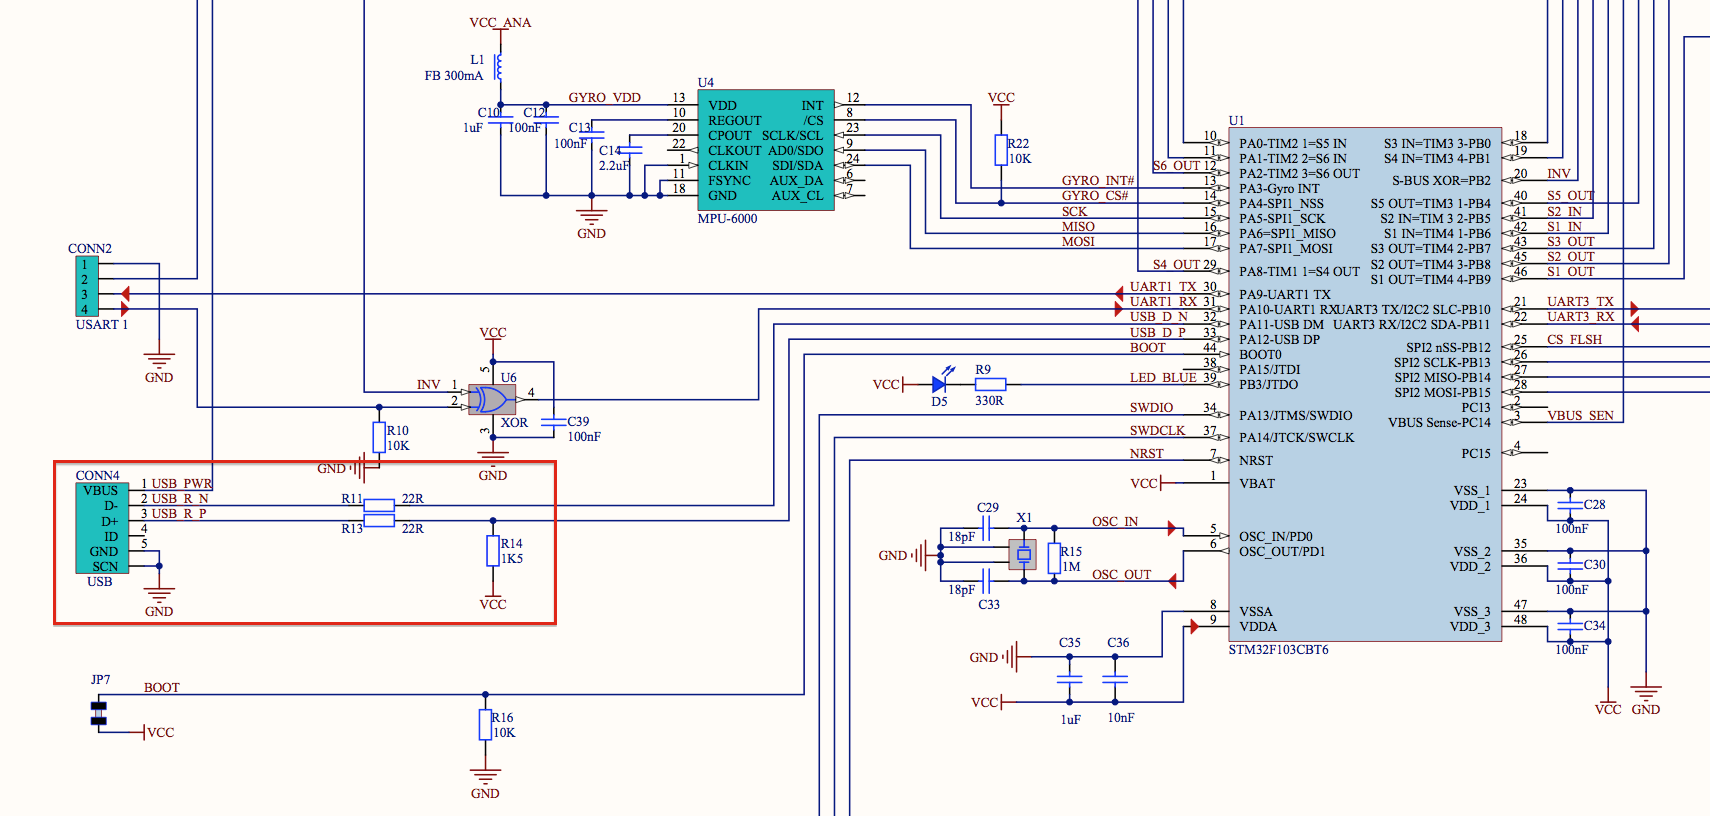
可以看到USB接口只使用到了两根的信号线PA11-USB-DM与PA12-USB-DP,并且PA12-USB-DP信号线通过R14 1.5K电阻上拉至VCC。
完整的电路图请看这里:
https://github.com/TauLabs/TauLabs/blob/next/flight/targets/coptercontrol/hw/CC3D/CopterControl%203D%20Schematic.pdf
2. 相关的代码如下(CC3D使用的MCU为STM32F103RBT6):
https://github.com/TauLabs/TauLabs/blob/next/flight/PiOS/STM32F10x/pios_usb.c
// ...
/**
 * Initialises USB COM layer
 * \return < 0 if initialisation failed
 * \note Applications shouldn't call this function directly, instead please use \ref PIOS_COM layer functions
 */
static uintptr_t pios_usb_com_id;
int32_t PIOS_USB_Init(uintptr_t * usb_id, const struct pios_usb_cfg * cfg)
{
	PIOS_Assert(usb_id);
	PIOS_Assert(cfg);

	struct pios_usb_dev * usb_dev;

	usb_dev = (struct pios_usb_dev *) PIOS_USB_alloc();
	if (!usb_dev) goto out_fail;

	/* Bind the configuration to the device instance */
	usb_dev->cfg = cfg;

	PIOS_USB_Reenumerate();

	/*
	 * This is a horrible hack to make this available to
	 * the interrupt callbacks.  This should go away ASAP.
	 */
	pios_usb_com_id = (uintptr_t) usb_dev;

	/* Enable the USB Interrupts */
	NVIC_Init((NVIC_InitTypeDef*)&usb_dev->cfg->irq.init);

	/* Select USBCLK source */
	RCC_USBCLKConfig(RCC_USBCLKSource_PLLCLK_1Div5);
	/* Enable the USB clock */
	RCC_APB1PeriphClockCmd(RCC_APB1Periph_USB, ENABLE);

	USB_Init();
	USB_SIL_Init();

	*usb_id = (uintptr_t) usb_dev;

	return 0;		/* No error */

out_fail:
	return(-1);
}

// ...

int32_t PIOS_USB_Reenumerate()
{
	/* Force USB reset and power-down (this will also release the USB pins for direct GPIO control) */
	_SetCNTR(CNTR_FRES | CNTR_PDWN);

	/* Using a "dirty" method to force a re-enumeration: */
	/* Force DPM (Pin PA12) low for ca. 10 mS before USB Tranceiver will be enabled */
	/* This overrules the external Pull-Up at PA12, and at least Windows & MacOS will enumerate again */
	GPIO_InitTypeDef GPIO_InitStructure;
	GPIO_StructInit(&GPIO_InitStructure);
	GPIO_InitStructure.GPIO_Pin = GPIO_Pin_12;
	GPIO_InitStructure.GPIO_Mode = GPIO_Mode_Out_PP;
	GPIO_InitStructure.GPIO_Speed = GPIO_Speed_50MHz;
	GPIO_Init(GPIOA, &GPIO_InitStructure);

	PIOS_DELAY_WaitmS(50);

	/* Release power-down, still hold reset */
	_SetCNTR(CNTR_PDWN);
	PIOS_DELAY_WaituS(5);

	/* CNTR_FRES = 0 */
	_SetCNTR(0);

	/* Clear pending interrupts */
	_SetISTR(0);

	/* Configure USB clock */
	/* USBCLK = PLLCLK / 1.5 */
	RCC_USBCLKConfig(RCC_USBCLKSource_PLLCLK_1Div5);
	/* Enable USB clock */
	RCC_APB1PeriphClockCmd(RCC_APB1Periph_USB, ENABLE);

	return 0;
}

// ...
从代码可以看到这里的做法是将USB的DP信号线强制拉低10ms, 使得Windows/Mac OS重新去枚举USB外设。
- BRO-DBG-LINK V2.1开发板的做法
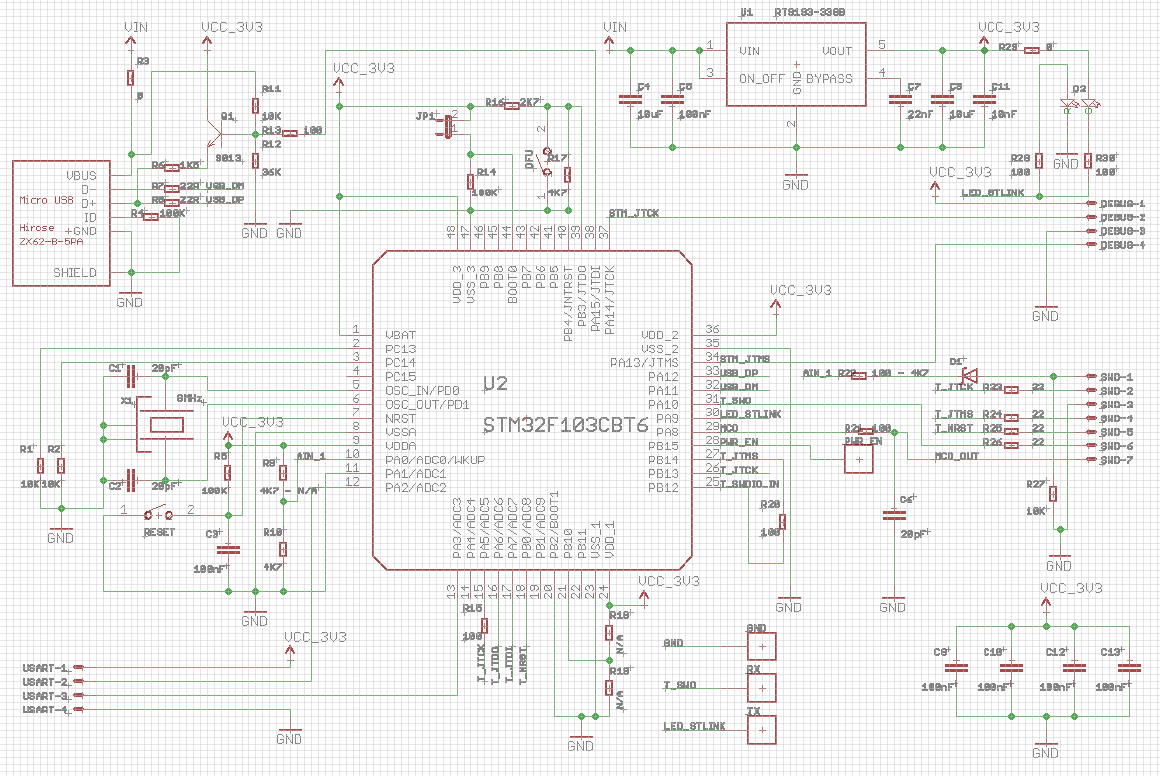
从原理图中可以看到有一个IO信号控制着一个NPN的三极管来上拉USB_DP的信号,由于三极管状态的改变并不会使得Windows或者是Mac OS去重新枚举这个设备,所以我们可以将这个NPN三极管一直设为导通状态。其余的做法就与CC3D的相同。
1. maple-bootloader中相关代码的修改:
void setupUSB(void) {
    u32 rwmVal; /* read-write-modify place holder var */

    /* Setup the USB DISC Pin: GPIOA & AFIO clock enable */
    rwmVal  = GET_REG(RCC_APB2ENR);
    rwmVal |= 0x00000005;
    SET_REG(RCC_APB2ENR, rwmVal);

    // JTAG-DP Disabled and SW-DP Enabled: Init GPIOA pin15
    rwmVal  = GET_REG(AFIO_MAPR);
    rwmVal &= ~AFIO_MAPR_SWJ_CFG;
    rwmVal |= AFIO_MAPR_SWJ_CFG_JTAGDISABLE;
    SET_REG(AFIO_MAPR, rwmVal);

    rwmVal  = GET_REG(GPIO_ODR(GPIOA));
    rwmVal &= ~0x00008000;
    SET_REG(GPIO_ODR(GPIOA), rwmVal); // disconnect

    /* Setup GPIOA Pin 15 as Open Drain output */
    rwmVal  = GET_REG(GPIO_CRH(GPIOA));
    rwmVal &= 0x0FFFFFFF;
    rwmVal |= 0x60000000;
    SET_REG(GPIO_CRH(GPIOA), rwmVal);

    // Wait ~190ms to indicate USB disconnection
    for (rwmVal = 0; rwmVal < 0x100000; rwmVal++) {
        asm volatile("nop");
    }

    /* USB clock enable */
    pRCC->APB1ENR |= 0x00800000;

    /* initialize the usb application */
    setPin(GPIOA, 15);  /* present ourselves to the host */

    usbAppInit();
}
NOTE: TODO
2. ChibiOS/RT中相关代码的修改
int __attribute__((noreturn)) main(void) {
// ...

  /*
   * Activates the USB driver and then the USB bus pull-up on D+.
   * Note, a delay is inserted in order to not have to disconnect the cable
   * after a reset.
   */
  usbDisconnectBus(serusbcfg.usbp);
  chThdSleepMilliseconds(1500);
  usbConnectBus(serusbcfg.usbp);

  /* Force USB reset and power-down (this will also release the USB pins for direct GPIO control) */
  STM32_USB->CNTR = CNTR_FRES | CNTR_PDWN;

  /* Using a "dirty" method to force a re-enumeration: */
  /* Force DPM (Pin PA12) low for ca. 10 mS before USB Tranceiver will be enabled */
  /* This overrules the external Pull-Up at PA12, and at least Windows & MacOS will enumerate again */
  palSetPadMode(GPIOA, GPIOA_USBDP, PAL_MODE_OUTPUT_PUSHPULL);

  chThdSleepMilliseconds(50);

  /* Release power-down, still hold reset */
  STM32_USB->CNTR = CNTR_PDWN;
  chThdSleepMilliseconds(1);

  /* CNTR_FRES = 0 */
  STM32_USB->CNTR = 0;

  /* Clear pending interrupts */
  STM32_USB->ISTR = 0;

  usbStart(serusbcfg.usbp, &usbcfg);

  // ...
}
- 相关的参考文档
- https://github.com/openpilot/OpenPilot
- https://github.com/TauLabs/TauLabs
- https://github.com/TauLabs/TauLabs/blob/next/flight/targets/coptercontrol/hw/CC3D/CopterControl%203D%20Schematic.pdf