常用的图象格式包括RGBA(32位), RGB(24位)及BGRA(24位)在ARM 32位及64位平台上转换有什么好的方法。
- 清华大学AOSP代码镜像
1. https://aosp.tuna.tsinghua.edu.cn
2. https://mirrors.tuna.tsinghua.edu.cn/help/AOSP/
3. 代码下载:
repo init -u https://aosp.tuna.tsinghua.edu.cn/platform/manifest -b android-7.1.1_r1 --repo-url=https://aosp.tuna.tsinghua.edu.cn/tools/repo.git
NOTE: 这里会参考skia的代码。
- C语言实现
CPU为小端模式,RGBA 在内存中从低到高排列为 RR GG BB AA, 用int32_t表示为0xAABBGGRR
1. RGBA转RGB
void rgba_to_rgb(unsigned char *src, unsigned char *dst, int numPixels)
{
    int col;

    for (col = 0; col < numPixels; col++, src += 4, dst += 3) {
        dst[0] = src[0];
        dst[1] = src[1];
        dst[2] = src[2];
    }
}
2. RGBA转BGRA ,又称之为RB swap
void rgba_to_bgra(unsigned char *src, unsigned char *dst, int numPixels)
{
    int col;

    for (col = 0; col < numPixels; col++, src += 4, dst += 4) {
        dst[0] = src[2];
        dst[1] = src[1];
        dst[2] = src[0];
        dst[3] = src[3];
    }
}
- ARM 32位平台带NEON
对于32位的ARM来说,NEON并不是标配,所以想运行下面的代码,还要看你的设备支不支持。
1. RGBA转BGRA
具体可以参考这篇文档:https://gist.github.com/micahpearlman/2512316
// Really awesome code taken from: http://apangborn.com/2011/05/pixel-processing-using-arm-assembly/
inline static void neon_rgba_to_bgra(unsigned char *src, unsigned char *dst, int numPixels)
{
#ifdef __ARM_NEON__
    int simd_pixels = numPixels & ~7; // round down to nearest 8
    int simd_iterations = simd_pixels >> 3;
    int col;
    if(simd_iterations) { // make sure at least 1 iteration
        __asm__ __volatile__ ("1: \n\t"
                              // structured load of 8 pixels into d0-d3 (64-bit) NEON registers
                              "vld4.8 {d0, d1, d2, d3}, [%[source]]! \n\t" // the "!" increments the pointer by number of bytes read
                              "vswp d0, d2 \n\t" // swap registers d0 and d2 (swaps red and blue, 8 pixels at a time)
                              "vst4.8 {d0, d1, d2, d3}, [%[dest]]! \n\t" // structured store the 8 pixels back, the "!" increments the pointer by number of bytes written
                              "subs %[iterations],%[iterations],#1 \n\t"
                              "bne 1b" // jump to label "1", "b" suffix means the jump is back/behind the current statement
                              : [source]"+r"(src), [dest] "+r"(dst), [iterations]"+r"(simd_iterations) // output parameters, we list read-write, "+", value as outputs. Read-write so that the auto-increment actually affects the 'src' and 'dst'
                              :  // no input parameters, they're all read-write so we put them in the output parameters
                              : "memory", "d0", "d1", "d2", "d3" // clobbered registers
                              );
    }
    // ...
#endif
}
需要用到的指令主要有vld4.8, vswap, vst4.8, 一次可以处理8个像素。
2. RGBA转RGB
参考上面的代码,我们可以很容易地写出相应的代码:
void neon_rgba_to_rgb(unsigned char *src, unsigned char *dst, int numPixels)
{
    int simd_pixels = numPixels & ~7; // round down to nearest 8
    int simd_iterations = simd_pixels >> 3;
    int col;
    if(simd_iterations) { // make sure at least 1 iteration
        __asm__ __volatile__ ("1: \n\t"
              // structured load of 8 pixels into d0-d3 (64-bit) NEON registers
              "vld4.8 {d0, d1, d2, d3}, [%[source]]! \n\t" // the "!" increments the pointer by number of bytes read
              "vst3.8 {d0, d1, d2}, [%[dest]]! \n\t" // structured store the 8 pixels back, the "!" increments the pointer by number of bytes written
              "subs %[iterations],%[iterations],#1 \n\t"
              "bne 1b" // jump to label "1", "b" suffix means the jump is back/behind the current statement
            : [source]"+r"(src), [dest] "+r"(dst), [iterations]"+r"(simd_iterations) // output parameters, we list read-write, "+", value as outputs.
                                                                                     // Read-write so that the auto-increment actually affects the 'src' and 'dst'
            :  // no input parameters, they're all read-write so we put them in the output parameters
            : "memory", "d0", "d1", "d2", "d3" // clobbered registers
        );
    }

    // swap the leftover pixels
    // ...
}
3. 代码编译
编译代码的时候要加上如下参数
LOCAL_CFLAGS := \
    -march=armv7-a -mtune=cortex-a8 -mfpu=neon
4. 转换效率
这里以memcpy做参考,请看systrace:
- ARM64位(AARCH64)平台上
在ARM 64位平台上,NEON就是标配。
本来以为ARM 32位的汇编代码直接编译成64位程序,可实际上并不是这样,指令都变了,所以还需要参考skia的代码:
版本:这里使用的android-7.1.1_r1版本上的skia, 代码在external/skia/src/opts/SkSwizzler_opts.h:
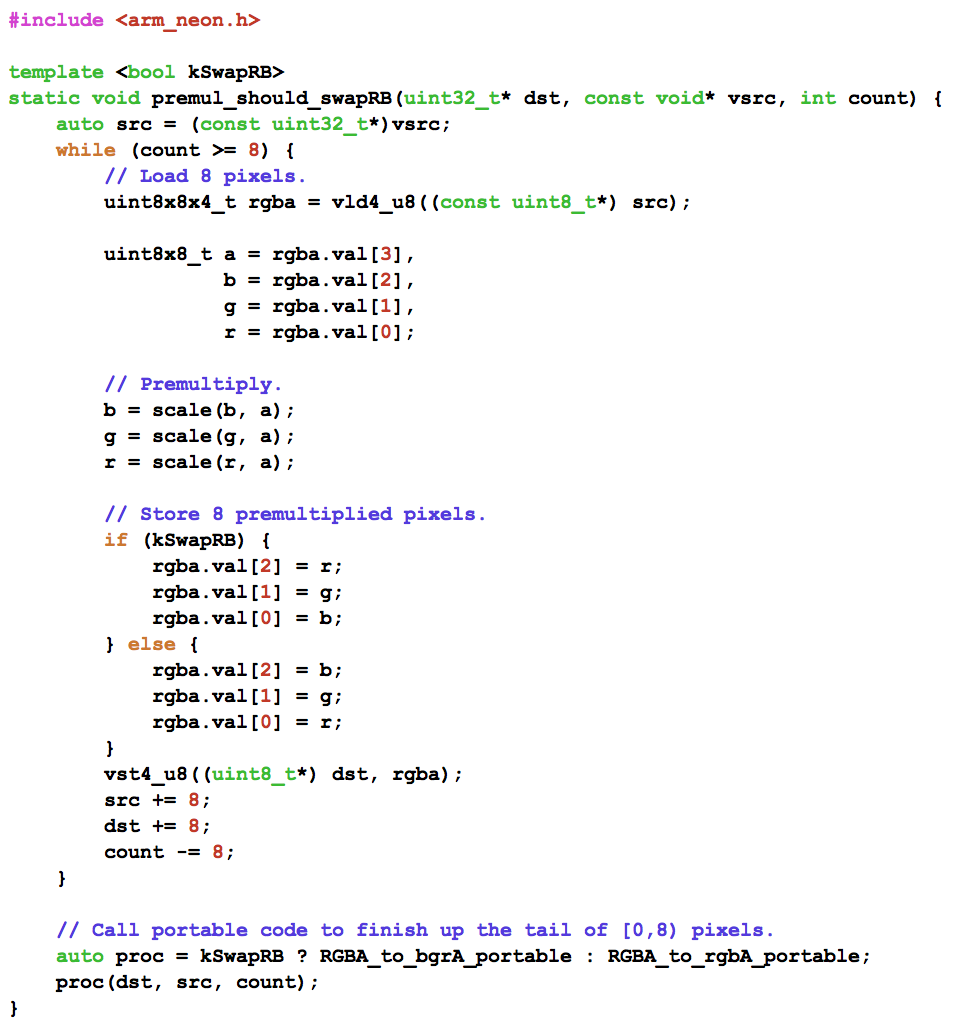
NOTE:
1. 这里我们需要使用arm_neon.h头文件,位于(@ Android NDK):
toolchains/aarch64-linux-android-4.9/prebuilt/darwin-x86_64/lib/gcc/aarch64-linux-android/4.9.x/include/arm_neon.h
2. 这里使用到了vld4_u8()及vst4_u8()函数,但却没有与vswp指令对应的函数
- 相关的参考文档
- https://mirrors.tuna.tsinghua.edu.cn/help/AOSP/
- https://gist.github.com/micahpearlman/2512316