当前,树莓派上所运行的Android 9系统,也是通过基于u-boot的bootloader引导开机的,这也是参考AndroidThings v1.0.4系统的。
下面这篇文档对Android官方提供的AndroidThings文件结构进行分析:
而这篇文档提供的相关的脚本工具,可以将Android官方提供的AndroidThings文件拆分成多个分区文件:
- 使用bootloader的优点
目前看来,使用bootloader会增加开机时间,但是有了它,我们可以:
- 通过它来升级系统
- 通过它来分析由bootcode.bin, start_x.elf及fixup_x.dat所生成的flat device tree
- 构建方法
1. 下载源代码:
$ git clone https://github.com/brobwind/pie-device-brobwind-rpi3-u-boot/ device/brobwind/rpi3/u-boot
2. 从https://github.com/raspberrypi/linux/blob/rpi-4.14.y/scripts/mkknlimg 下载mkknlimg脚本
$ curl https://raw.githubusercontent.com/raspberrypi/linux/rpi-4.14.y/scripts/mkknlimg > device/brobwind/rpi3/u-boot/mkknlimg
$ chmod +x device/brobwind/rpi3/u-boot/mkknlimg
3. 编译
$ cddevice/brobwind/rpi3/u-boot
$ ARCH=arm64 CROSS_COMPILE=../../../../prebuilts/gcc/linux-x86/aarch64/aarch64-linux-android-4.9/bin/aarch64-linux-androidkernel- make rpi_3_defconfig
$ ARCH=arm64 CROSS_COMPILE=../../../../prebuilts/gcc/linux-x86/aarch64/aarch64-linux-android-4.9/bin/aarch64-linux-androidkernel- make
4. 加标记
$ ./mkknlimg --dtok --ddtk --270x u-boot.bin u-boot-dtok.bin
- u-boot环境变量
在rpiboot(device/brobwind/rpi3/boot/rpiboot)目录下,有个名为uboot.env的文件,用于存放u-boot的环境变量。可以用 https://chromium.googlesource.com/chromiumos/platform/uboot-env/+/refs/heads/master/uboot-env.py 这个工具进行编辑。
原文件dump出来的内容如下:
$ ./uboot-env.py --list -f uboot.env
android_rootdev="/dev/mmcblk${android_root_devnum}p${android_root_partnum}"
stderr=serial,lcd
oem_bootloader_a=0x0d
stdout=serial,lcd
initrd_high=2d000000
stdin=serial
autoload=no
fastbootcmd=
  usb start &&
  dhcp &&
  fastboot udp
fdt_high=2e000000
oem_overlay_max_size=0x4000
oem_bootloader_b=0x0e
bootcmd=
  fdt addr "${fdt_addr}";
  fdt resize "${oem_overlay_max_size}";
  android_ab_select "android_slot" mmc "0;misc" || run fastbootcmd || reset;
  test "${android_slot}" = "a" && env set oem_part "${oem_bootloader_a}";
  test "${android_slot}" = "b" && env set oem_part "${oem_bootloader_b}";
  ext2load mmc "0:${oem_part}" "${fdt_high}" /kernel.dtbo &&
      fdt apply "${fdt_high}";
  fdt get value bootargs /chosen bootargs;
  setenv bootargs "${bootargs} androidboot.serialno=${serial#}";
  boot_android mmc "0;misc" "${android_slot}" "${kernel_addr_r}";
  reset
kernel_addr_r=0x01000000
board=rpi3
- 常用的一些命令
在执行这些命令之前,你需要使用串口线, 树莓派通过这条串口线(USB转串口线)与PC机进行通信,

(图片来自: https://developer.android.com/things/hardware/raspberrypi#serial-console)
配置串口为115200,8n1。这里,将使用minicom软件对串口设备(/dev/ttyUSB0)进行操作:
$ sudo minicom -b 115200 -D /dev/ttyUSB0
这时,在系统开机时,你将会看到如下log:
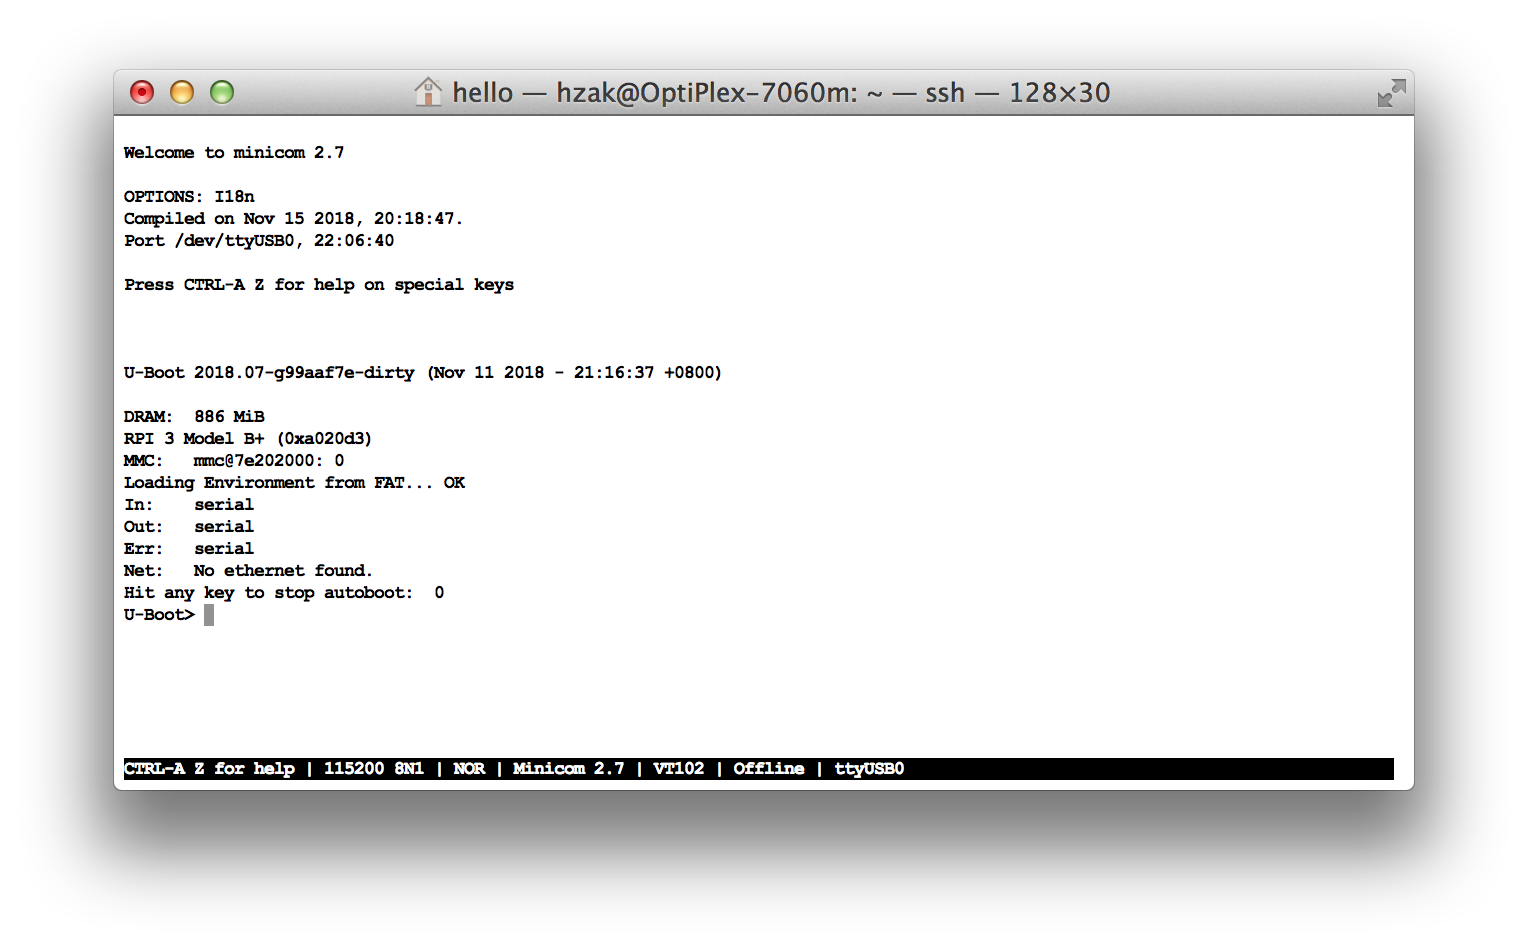 当出现”Hit any key to stop autoboot: …” 时,按下任意键将进入交互模式。
可以看到,内置了很多常用的命令:
U-Boot> help
?       - alias for 'help'
android_ab_select- Select the slot used to boot from and register the boot attempt.
base    - print or set address offset
bdinfo  - print Board Info structure
blkcache- block cache diagnostics and control
boot    - boot default, i.e., run 'bootcmd'
boot_android- Execute the Android Bootloader flow.
bootd   - boot default, i.e., run 'bootcmd'
bootefi - Boots an EFI payload from memory
booti   - boot arm64 Linux Image image from memory
bootm   - boot application image from memory
bootp   - boot image via network using BOOTP/TFTP protocol
cmp     - memory compare
coninfo - print console devices and information
cp      - memory copy
crc32   - checksum calculation
dhcp    - boot image via network using DHCP/TFTP protocol
dm      - Driver model low level access
echo    - echo args to console
editenv - edit environment variable
env     - environment handling commands
exit    - exit script
ext2load- load binary file from a Ext2 filesystem
ext2ls  - list files in a directory (default /)
ext4load- load binary file from a Ext4 filesystem
ext4ls  - list files in a directory (default /)
ext4size- determine a file's size
false   - do nothing, unsuccessfully
fastboot- run as a fastboot usb or udp device
fatinfo - print information about filesystem
fatload - load binary file from a dos filesystem
fatls   - list files in a directory (default /)
fatsize - determine a file's size
fatwrite- write file into a dos filesystem
fdt     - flattened device tree utility commands
fstype  - Look up a filesystem type
go      - start application at address 'addr'
gpio    - query and control gpio pins
gzwrite - unzip and write memory to block device
help    - print command description/usage
iminfo  - print header information for application image
imxtract- extract a part of a multi-image
itest   - return true/false on integer compare
lcdputs - print string on video framebuffer
load    - load binary file from a filesystem
loadb   - load binary file over serial line (kermit mode)
loads   - load S-Record file over serial line
loadx   - load binary file over serial line (xmodem mode)
loady   - load binary file over serial line (ymodem mode)
loop    - infinite loop on address range
ls      - list files in a directory (default /)
lzmadec - lzma uncompress a memory region
md      - memory display
mdio    - MDIO utility commands
mii     - MII utility commands
mm      - memory modify (auto-incrementing address)
mmc     - MMC sub system
mmcinfo - display MMC info
mw      - memory write (fill)
nfs     - boot image via network using NFS protocol
nm      - memory modify (constant address)
part    - disk partition related commands
ping    - send ICMP ECHO_REQUEST to network host
printenv- print environment variables
pxe     - commands to get and boot from pxe files
reset   - Perform RESET of the CPU
run     - run commands in an environment variable
save    - save file to a filesystem
saveenv - save environment variables to persistent storage
setcurs - set cursor position within screen
setenv  - set environment variables
setexpr - set environment variable as the result of eval expression
showvar - print local hushshell variables
size    - determine a file's size
sleep   - delay execution for some time
source  - run script from memory
sysboot - command to get and boot from syslinux files
test    - minimal test like /bin/sh
tftpboot- boot image via network using TFTP protocol
true    - do nothing, successfully
unzip   - unzip a memory region
usb     - USB sub-system
usbboot - boot from USB device
version - print monitor, compiler and linker version
1. 查看u-boot环境变量
U-Boot> printenv
android_rootdev="/dev/mmcblk${android_root_devnum}p${android_root_partnum}"
autoload=no
board=rpi3
board_name=3 Model B+
board_rev=0xD
board_rev_scheme=1
board_revision=0xA020D3
bootcmd=\
  fdt addr "${fdt_addr}"; \
  fdt resize "${oem_overlay_max_size}"; \
  android_ab_select "android_slot" mmc "0;misc" || run fastbootcmd || reset; \
  test "${android_slot}" = "a" && env set oem_part "${oem_bootloader_a}"; \
  test "${android_slot}" = "b" && env set oem_part "${oem_bootloader_b}"; \
  ext2load mmc "0:${oem_part}" "${fdt_high}" /kernel.dtbo && \
      fdt apply "${fdt_high}"; \
  fdt get value bootargs /chosen bootargs; \
  setenv bootargs "${bootargs} androidboot.serialno=${serial#}"; \
  boot_android mmc "0;misc" "${android_slot}" "${kernel_addr_r}"; \
  reset
ethaddr=b8:27:eb:3a:df:1c
fastbootcmd=\
  usb start && \
  dhcp && \
  fastboot udp
fdt_addr=2eff9400
fdt_high=2e000000
fdtcontroladdr=375a1910
fdtfile=broadcom/bcm2837-rpi-3-b-plus.dtb
initrd_high=2d000000
kernel_addr_r=0x01000000
oem_bootloader_a=0x0d
oem_bootloader_b=0x0e
oem_overlay_max_size=0x4000
serial#=00000000ce3adf1c
stderr=serial,lcd
stdin=serial
stdout=serial,lcd
usbethaddr=b8:27:eb:3a:df:1c

Environment size: 1229/16380 bytes
从这里可以看到,在我们执行fastbootcmd做了:
- 1. 执行usb相关的操作:扫描usb设备
- 2. 执行dhcp命令,自动分配IP地址
- 3. 启动fastboot服务,走的是udp协议
2. 进入fastboot模式,更新系统文件:rpiboot.img, boot.img, system.img, vendor.img,如更新rpiboot.img
进入fastboot模式之前,需要将树莓派通过网线接入到与下载系统文件的PC同一网络中,在minicom中执行run fastbootcmd命令:
U-Boot> run fastbootcmd
starting USB...
USB0:   scanning bus 0 for devices... 5 USB Device(s) found
       scanning usb for storage devices... 0 Storage Device(s) found
lan78xx_eth Waiting for PHY auto negotiation to complete..... done
BOOTP broadcast 1
DHCP client bound to address 192.168.5.211 (6 ms)
lan78xx_eth Waiting for PHY auto negotiation to complete...... done
Using lan78xx_eth device
Listening for fastboot command on 192.168.5.211
可以看到,当前树莓派已经连接成功,分配到的IP地址为192.168.5.211。这时,我们就可以在另一个终端上执行如下命令将rpiboot.img写入到rpiboot分区:
$ fastboot -s udp:192.168.5.211 flash rpiboot out/target/product/rpi3/rpiboot.img
而在minicom界面,你可以看到如下信息:
U-Boot> run fastbootcmd
starting USB...
USB0:   scanning bus 0 for devices... 5 USB Device(s) found
       scanning usb for storage devices... 0 Storage Device(s) found
lan78xx_eth Waiting for PHY auto negotiation to complete..... done
BOOTP broadcast 1
DHCP client bound to address 192.168.5.211 (6 ms)
lan78xx_eth Waiting for PHY auto negotiation to complete...... done
Using lan78xx_eth device
Listening for fastboot command on 192.168.5.211
Starting download of 67108864 bytes
..........................................................................
..........................................................................
..........................................................................
..........................................................................
..........................................................................
..........................................................................
....................................................................
downloading of 67108864 bytes finished
Flashing Raw Image
........ wrote 67108864 bytes to 'rpiboot'
由于我们使用了A/B分区,当前我们只使用到A分区,所以更新boot.img, system.img, vendor.img的命令如下:
$ fastboot -s udp:192.168.5.211 flash boot_a out/target/product/rpi3/boot.img
$ fastboot -s udp:192.168.5.211 flash system_a out/target/product/rpi3/system.img
$ fastboot -s udp:192.168.5.211 flash vendor_a out/target/product/rpi3/vendor.img
擦除userdata分区:
$ fastboot -s udp:192.168.5.211 erase userdata
Erasing 'userdata'...
(bootloader) erasing
OKAY [  3.249s]
Finished. Total time: 3.288s
3. 查看device tree信息
在minicom中执行如下命令,可以查看系统启动时创建的device tree信息:
U-Boot> fdt addr ${fdt_addr}
U-Boot> fdt print
/ {
        memreserve = <0x37600000 0x08000000>;
        serial-number = "00000000ce3adf1c";
        compatible = "raspberrypi,3-model-b-plus", "brcm,bcm2837";
        model = "Raspberry Pi 3 Model B Plus Rev 1.3";
        interrupt-parent = <0x00000001>;
        #address-cells = <0x00000001>;
        #size-cells = <0x00000001>;
        system {
                linux,serial = <0x00000000 0xce3adf1c>;
                linux,revision = <0x00a020d3>;
        };
        axi {
                vc_mem {
                        reg = <0x3e200000 0x3f600000 0xc0000000>;
                };
        };
// ...
};
这在配置config.txt文件时特别有用。
4. 通过执行run bootcmd加载kernel启动Android系统
U-Boot> run bootcmd
ANDROID: Booting slot: a
72 bytes read in 1 ms (70.3 KiB/s)
ANDROID: reboot reason: "(none)"
Booting kernel at 0x1000000 with fdt at 2eff9400...


## Booting Android Image at 0x01000000 ...
Kernel load addr 0x10080000 size 19627 KiB
Kernel command line: console=ttyS0,115200 buildvariant=eng buildvariant=eng
## Flattened Device Tree blob at 2eff9400
   Booting using the fdt blob at 0x2eff9400
   Loading Kernel Image ... OK
   reserving fdt memory region: addr=0 size=1000
   reserving fdt memory region: addr=2eff9400 size=ac00
   Loading Device Tree to 000000002dff2000, end 000000002dfffbff ... OK

Starting kernel ...

[    0.000000] Booting Linux on physical CPU 0x0